I feel i have to come out the closet and say i am a bone fide fan of phot'ting with mobile phones..
Proponents of micro FT in particular often say the best camera you can have is the one you always take with you. That of course is self defeating when a 14-150 (or even the 14-42 )is a chunky lens package even on the smallest two bodies for mFT.
Fixed lens with digital zoom is not just being driven by the size and fast f stops of the prime lenses for the mirrorless MILC cameras, but also by the majority of mobiles having fixed lenses in the eq. 35mm of 28 to 40 mm approx. So let's back up here a minute....no back up and take a photo or walk in and get a portrait.
Mobile devices have for some time superseded stand alone cameras as the means by which the majority of images are taken, and if you take amateur publishing on social media, trad' is in the tiny minority of images up loaded.
This is the real thing; where will your images live?
If a photographer with a Nikon D4s or a LeicaM5 goes into a deep forrest, and takes a technically perfect photo of a leaf, yet never puts it on Flickr, was the photo ever taken?
My images will live on the internet that is sure, with maybe a few being printed out for wall viewing and of course my annual family picture books which my close relatives get.
This christmas for the first time over one in ten shots included in the book design were from my HTC desire.
There was good reason for this; they were good images which captured something special enough to beat hundreds of E450 shots into the album. Also despite warnings from the software about mpg, on reading these books there is actually very litte to say in IQ apart from they are clearly not taken with a DSLR with a fast lens! They are good enough at reading distance and look like good qaulity 5 mpegapixel compact camera images from say six years ago.
The HTC desire I think has a big pinch: the jpeg engine seems to be pure olypmpus- medium hard sharpening, perfect contrast and saturation for facebook eye catching thumbnails, and then of course the Oly skin tones and wonderful blue sky seem to be uncannily integrated there!!!
iPhone 4 / 5 and iPad have really useful cameras and wonderful software such as the quicktime capture and the panorama stitch with perfect exposure compensation for each image to be stitched.
So now those nice little earners for companies, the 150-250 euro compact cameras and the cheaper end are pretty much dead in the water, especially when more optical zoom lenses are integrated to mobile devices. Cameras with modest zoom ranges and small sensors will basically have to become phones or die. The only survivors will be the higher end hobby and pro/wanna be compact single lens, and they will have wifi and the next generation blue tooth in body, if not actually 4G LTE and a dialer screen.
I expect we will see interchangeable lens system top end mobiles, perhaps with the back-to-the-future film camera style carousel of lenses. Another parallell to that would be to have actually three cameras built in: super wide, eye-magnification (c 65mm) and then 120, each onto a 8 mpx chip and each achieving a crop zoom half way to the next objective. Then it is all solid state and sealed in body, and as you zoom on screen, the entire camera is changed seamlessly.
Another technology will be utilising multiple layer effects to create images previoulsy reserved for DSLR with sub f3 lenses: back ground blur by auto masking two versions of the shot and blurring one, and macro shots by taking several focus layers and using predictive extrapolation to make sharpness in between layers. These are all do-able with todays quad core processors.
With that type of technology in mobiles and a modest use of megapixels on slightly larger sensors with slightly longer flange-film plane distances, then they eat also into the hobby compact camera market, as in fact they do now: why do I need a compact which is not really pocket size like the XZ2? why pay so much for thexz10 when it has a small sensor?
søndag 17. mars 2013
mandag 11. mars 2013
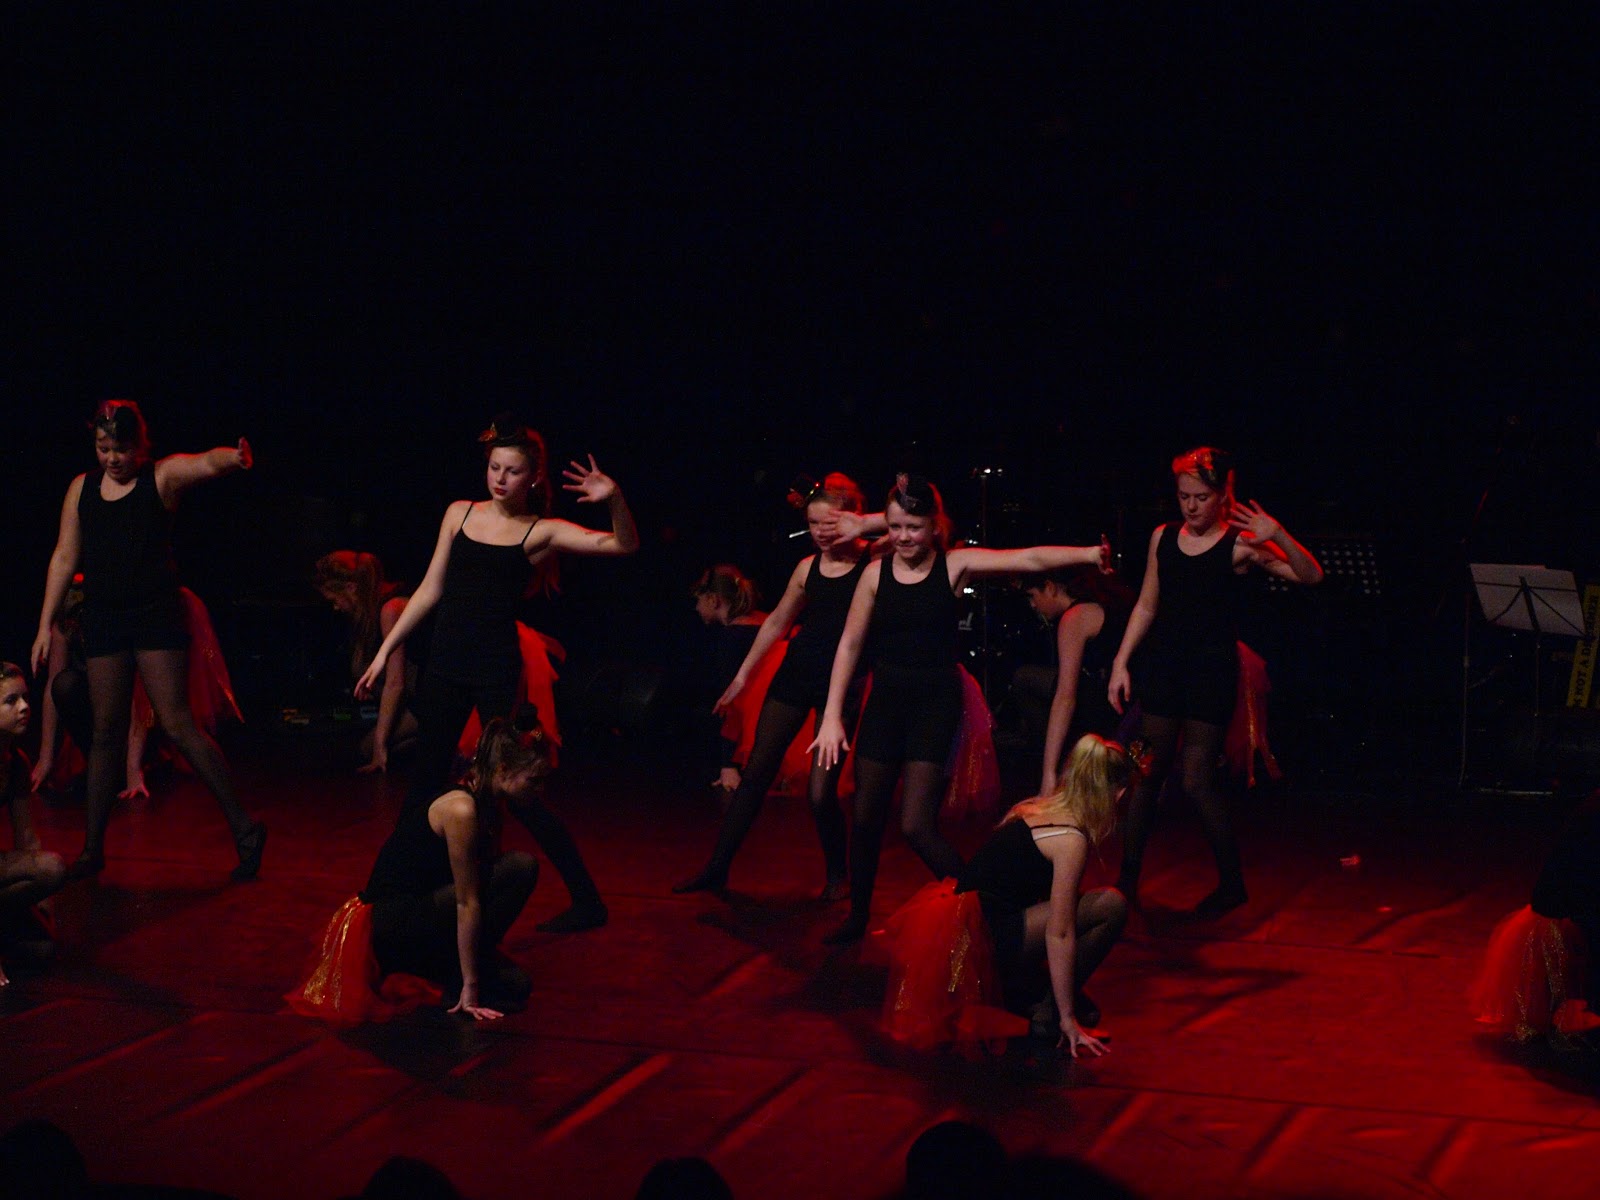
Over Coming Percieved Weakness: Olympus E450 (420) Indoor, Low Light

I feel that I am kind of at a level of diminishing returns in terms of learning curve for the Olympus E450, which has basically been my dream camera in terms of replacing a stolen Om4Ti with a camera with relatively endless, free film and processing!
One area which annoyed me for a long time was the fairly useless indoor focusing capabilities with the E450. Quite a few entry level DSLR cameras from a few years ago were poor in this respect, so the Oly is not alone, but there must have been many prospective buyers put off in shops while trying to get a sharp shot in low light!
As in many areas of life I see a weakness as something to be worked upon and really an opportunity of improvement, improvisation and a feeling of both frustration with the approach and satisfaction in the journey and end result. A little perseverance and trial and error and hey presto, much more satisfactory results as below.

Summary of Approaches and Post Processsing:
There are a couple of fixes to low light and night phot'ing which involve focusing set ups, white balance and exposure test shots and then a mixture of either tripod or higher ISO settings. Focusing is about pre-indexing and could be equally applied to sports photography in bright light at high shutter speeds.
1) Resetting the AEL/AFL button to focus lock. I haven't done this for a while , but if you are at a concert as above and have a FT/mFT 1st generation camera with an f stop above 4 useable then the better depth of field for exposure value on the FT crop / sensor means that you can find a focus when the stage is bright, lock it on a central pointm and then leave alone until you move position yourself out of the seat!
With a faster lens, or a closer view point in the stalls, you probably want to repeat this but may be as well reverting to holding focus on half depressed shutter and releasing the shutter button: faster SWD lenses may work better anyway in this type of situation.
2) Manual focus. The e450 is a bit of a pain to get in and out of the mode above and because you are likely to touch the AEL button inadvertently or want to maybe use it for exposure locking rather than focusing, then you may just as well use manual focus. This applies to night outdoors too. You use the liveview zoom function to get a point on the mid of the stage in focus while having the camera very stable pre-show using the back of the seat in front or a bag or the like on your lap. A technique I learned while working as a surveryors assistant one summer in 1986, was to rock the focus by turning the ring both ways around the initial best focus roughly, until you get the best "peak" of sharpness in the decreasing oscillations ( I later used this as a scientist down microscopes, standard technique!)
If there is a little more light, then you can use PDAF ( still on in MF but just metering BTW) and through the lens with first your eye as a rough guide then trying to see if the in-focus indicator circle lights up as you search for light or high contrast spots on the stage or subject.
Lenses like the prime 25(50eq.)mm and the 14-35 (28-70 eq)mm have much better manual focus but practice in the two above will allow you to at least "index" ie lock to the night's action zone before the subjects come on stage or whatever!
3) Now onto technique, compositions and in camera settings:
a) At normal ISO you will struggle to get bright images, but remember you can rescue a lot from olypmpus' images in the shadows and with less noise at ISO200 you may get in fact a better end result.
b) IS0 400 is fine ,but the noise to speed pay off is better at 800
c) 1600 is getting noisy, so what, switch to black and white and enjoy the free grain!
d) Decide based on the above what your constraints of shutter speed will be for the shoot. If it is going to be 60th of a second then you have the following choices:
i) still as possible subject
ii) Panning with the action and taking multiple shots with that chosen in the shutter setting
e) for ISO800 you may be able to shoot at up to 250th of a second and push the shadows
f) 125th of a second is enough to freeze some slow movement while flailing arms for example become an interesting feature of your image.
g) as above, will the image be better in monochrome anyway? WIth more action, switch over to ISO1600 and blast away some frames of action.
h) Remember, remember that camera shake is an issue: use your arms on thighs and press the camera to your face while sitting heavily and comfortably in order to make a tripod effect, or use the back of the seat infront. If you need to stand at say the ovation, pump up to higher ISO. Squeeze the trigger soldier, don't pull it!!
i) Take a lot of photos, and take a good few test photos.
j) use spot metering often for unusually lit subjects. You will see that the photos above are just on center balanced and may have benefited from a spot meter and AEL lock on the best subject.
k) use an alternative to J, auto bracketing if you cannot see results are quite perfect on the cameras programme. Alternatively to save memory and time, just flip the exposure up and down on the wheel a step to catch the odd attempt. Remember under exposed is revoerably, over-exposed will have blocky highlights on older FT cameras and there will likely be more polychromatic noise.
4) Post Processing.
a) lifitng the shadows: This is actually a bit like being the in the dark room at the photo club in 1983 for me: as if by magic, the olympus has recorded detail you cannot see in the original and you can "wash" it out in curve work at the lower end. Lifting detail without destroying absolute shadow, reducing contrast and introducing chromatic error is a bit of a black art, and worthy of its own section. In GIMP and photoshop you can just try to lift the curve about 5% up just a little way in from the last shadow area in the bottom left hand corner, and if your version auto adjust the rest of the curve, then you need to set several points or just play about until you lift detail out of darker areas without the unwanted side effects.
You may want to use masks to selectively lift an area for detail, while actually in the scenes above, you may want to drop the background or "cheat Full Frame Aperture" by blurring the background. Masking basics are covered in an earlier blog and any good manual or HELP for better image processing packages.
b) Looking for Crops with nice Compositions. Another thing to do, self explanatory, but you can often get something better from cropping out "blah blah" or selecting a small part of the image which is fun.
c) Noise filtering manually. The Noise Doctor: This is once again an area worth an entire bloggopedia, but basically for low light and night photos taken at ISO800 at least, the shadows will be the predominant source of irritating noise. You will be able to see though if you zoom to the level individual pixels show up, that there is often a predominant colour of noise: blue in the ones above. I have more often had olympus "red speckled hen" which is actually predominant at ISO1600. In either case you can choose the blue or red channel in "curves" and the easiest thing to do is to actually crop the histogram in on the dark end, or you can manipulate the curve more subtely. The majority of the blue or red specks of noise then fade into black and as if by magic you have a 2007 camera sensor which pushes results like the best prior to Sony's latest 16-32 megapixel wonder sensors.
With Polychromatic noise in lighter areas, still do this for the dark areas and then run a de-noising programme or feature (oly' viewer is pretty dire, GIMP has some okay plug ins, while PS and LR seem to have a lot of smoothing in their out-of-box amateur versions according to users)
Then you need to:
d) Sharpen. Decide how the image is to be used: if you are cropping or enlarging for a print to be used in a book or as a large screen image, then an otherwise moderate amount of sharpening can look plasticy when seen larger. However some printers respond well to sharpening and produce better results. You know your use. For a small image, or in black and white, you can push sharpening to quite excessive legnths and improve "Image Impact" on screen or for news print. Sharpening can get you back to 250th of a second from 125th if you are lucky and have just a little bit of blur from shake or subject movement.
Also it can enhance the subject "free of charge" by sharpening: you can achieve this best sometimes by choosing a higher threshold in unsharp mask ( over 12 pixels to say 20 pixels) which favours higher contrast and more prominent detail that was there already rather than any old line or artefact.
e) Try Monochrome in Post. I see on the photo-forums that a lot of people think they can get published by shooting at a concert, for at least the local press or a web site, or they may whangle a press-pass. My pal Ken Dobie was actually one of the FEW amateurs who dared do this with an EOS and fast monofilm in the 80s. His results are more to my taste than the usual kind of high ISO, low contrast, purpely crap expoused for "my first shoot at the fuddy waters concert".
Some images which capture a mood or expression or something in a scene or still life in low light can be thoroughly transformed from wishy washy, strange coloure balance fails into stunning monochromes. Dont hold back on high contrast and blocky highlights and shadows! Enjoy pulling the curves and pushing the sliders and even try a grain effect ( blogged on earlier)
Abonner på:
Innlegg (Atom)